Getting Started
Install
Install .NET 10 first (on macOS, 10.0.13 or later), then install CodeAlta Desktop and launch it from a project folder:
dotnet tool install -g CodeAlta
alta
CodeAlta Desktop is the app we recommend. CodeAlta TUI runs the same agents in a terminal, on the same ~/.alta profile:
dotnet tool install -g CodeAlta.Tui
altatui
| App | NuGet package | Command |
|---|---|---|
| CodeAlta Desktop | CodeAlta |
alta |
| CodeAlta TUI | CodeAlta.Tui |
altatui |
| CodeAlta CLI, without a window (Command Line) | CodeAlta.Cli |
altacli |
You can install both; Desktop and TUI compares them. For the TUI, dnx --yes CodeAlta.Tui installs, updates and runs it in one command.
- The folder you launch from is opened as a project.
- CodeAlta keeps its state under
~/.alta/: configuration, logs, provider state, sessions, agent prompts, plugins and skills. - Only one CodeAlta runs on a profile at a time: close the desktop app before starting the TUI, and the other way around.
Add a project
alta . adds the current folder as a project of the desktop app, the way code . opens a folder in VS Code; alta <folder> adds the folder named. CodeAlta comes to the front with the project, whether it was running or not.
alta .                                   # the current folder
alta ~/src/my-repo                       # another folder
alta . --space work                      # and put it in the space "work"
alta ~/src/repo-a ~/src/repo-b ~/src/repo-c
The window shows the first folder. --space takes the id, the start of the id or the name of a space, and can be repeated; every project is in the default space too. Plain alta only shows the window of a running CodeAlta.
Desktop requirements
The desktop app uses the web view of the system:
- Windows: WebView2, part of Windows 11 and of an up-to-date Windows 10.
- macOS: macOS 11 or later.
- Linux: WebKitGTK 6.0 with GTK 4, in an X11 or Wayland session. On Ubuntu 24.04 or later:
sudo apt-get install libgtk-4-1 libwebkitgtk-6.0-4.
When the window cannot start, CodeAlta says why and what to do: see The desktop app does not start.
On its first start, the desktop app adds itself to the Start Menu on Windows, to ~/Applications on macOS, or to the applications menu on Linux, so you can start it without a terminal.
- macOS Dock: Reveal in Finder opens the Applications folder of your home folder with CodeAlta selected: drag it to the Dock. The entry stays the same across updates.
- macOS permissions: System Settings > Privacy & Security lists the app as CodeAlta. A permission given there usually stays across updates; started from a terminal, CodeAlta uses the permissions of that terminal. Remove the entries of older versions, listed as
alta, with −. - Terminal:
altagives the prompt back once the window is open;alta --waitkeeps the terminal until the app closes. - Manual update: after
dotnet tool update -g CodeAlta, startaltaonce from a terminal to refresh the Start Menu shortcut or the Dock entry. Update and restart in the app does it for you.
Terminal font
The TUI uses Nerd Fonts icons. Install a current Nerd Font (v3 or later) and select it in your terminal profile before using altatui, or icons show as boxes or wrong symbols. The desktop app does not need it.
Download a recent font from the Nerd Fonts downloads, remove older copies of the same font first, choose it in your terminal profile (such as CaskaydiaCove Nerd Font), and restart the terminal. See Glyphs look wrong if icons are still wrong.
First launch
On first launch, CodeAlta writes a ~/.alta/config.toml with common providers, all disabled, and opens the provider setup: Settings > Providers in the desktop app, with a short guide the first time, or the Model Providers dialog in the TUI.
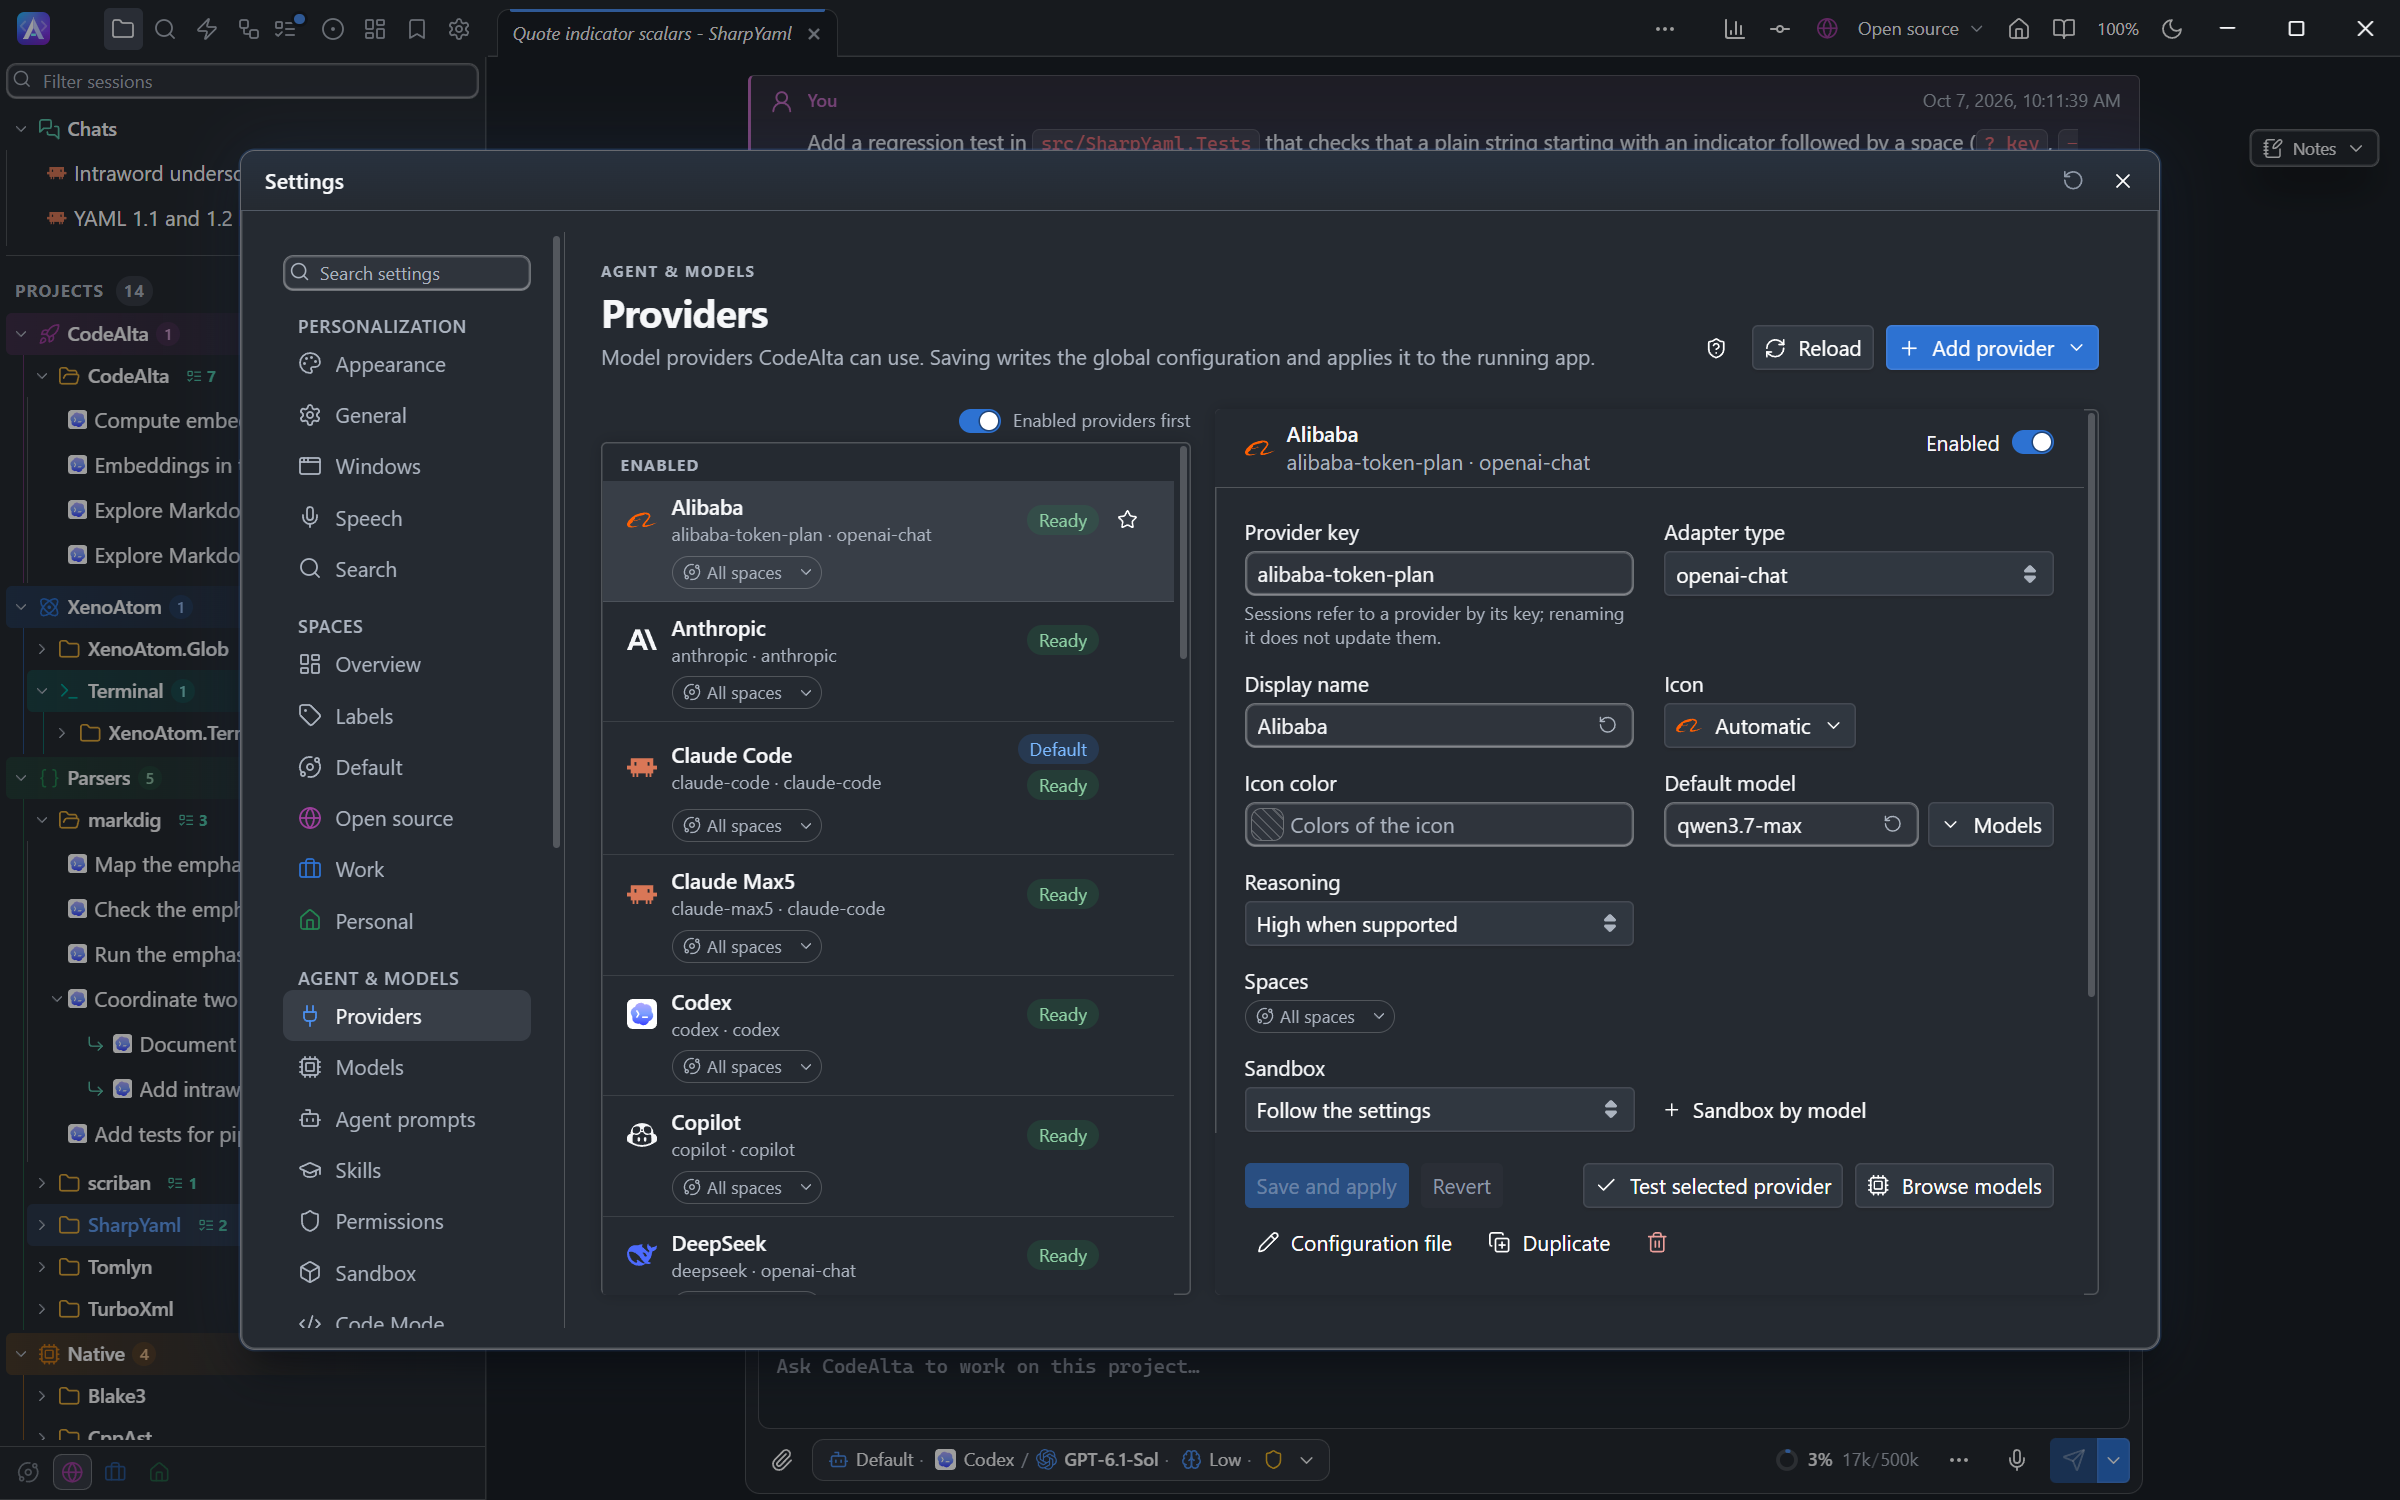
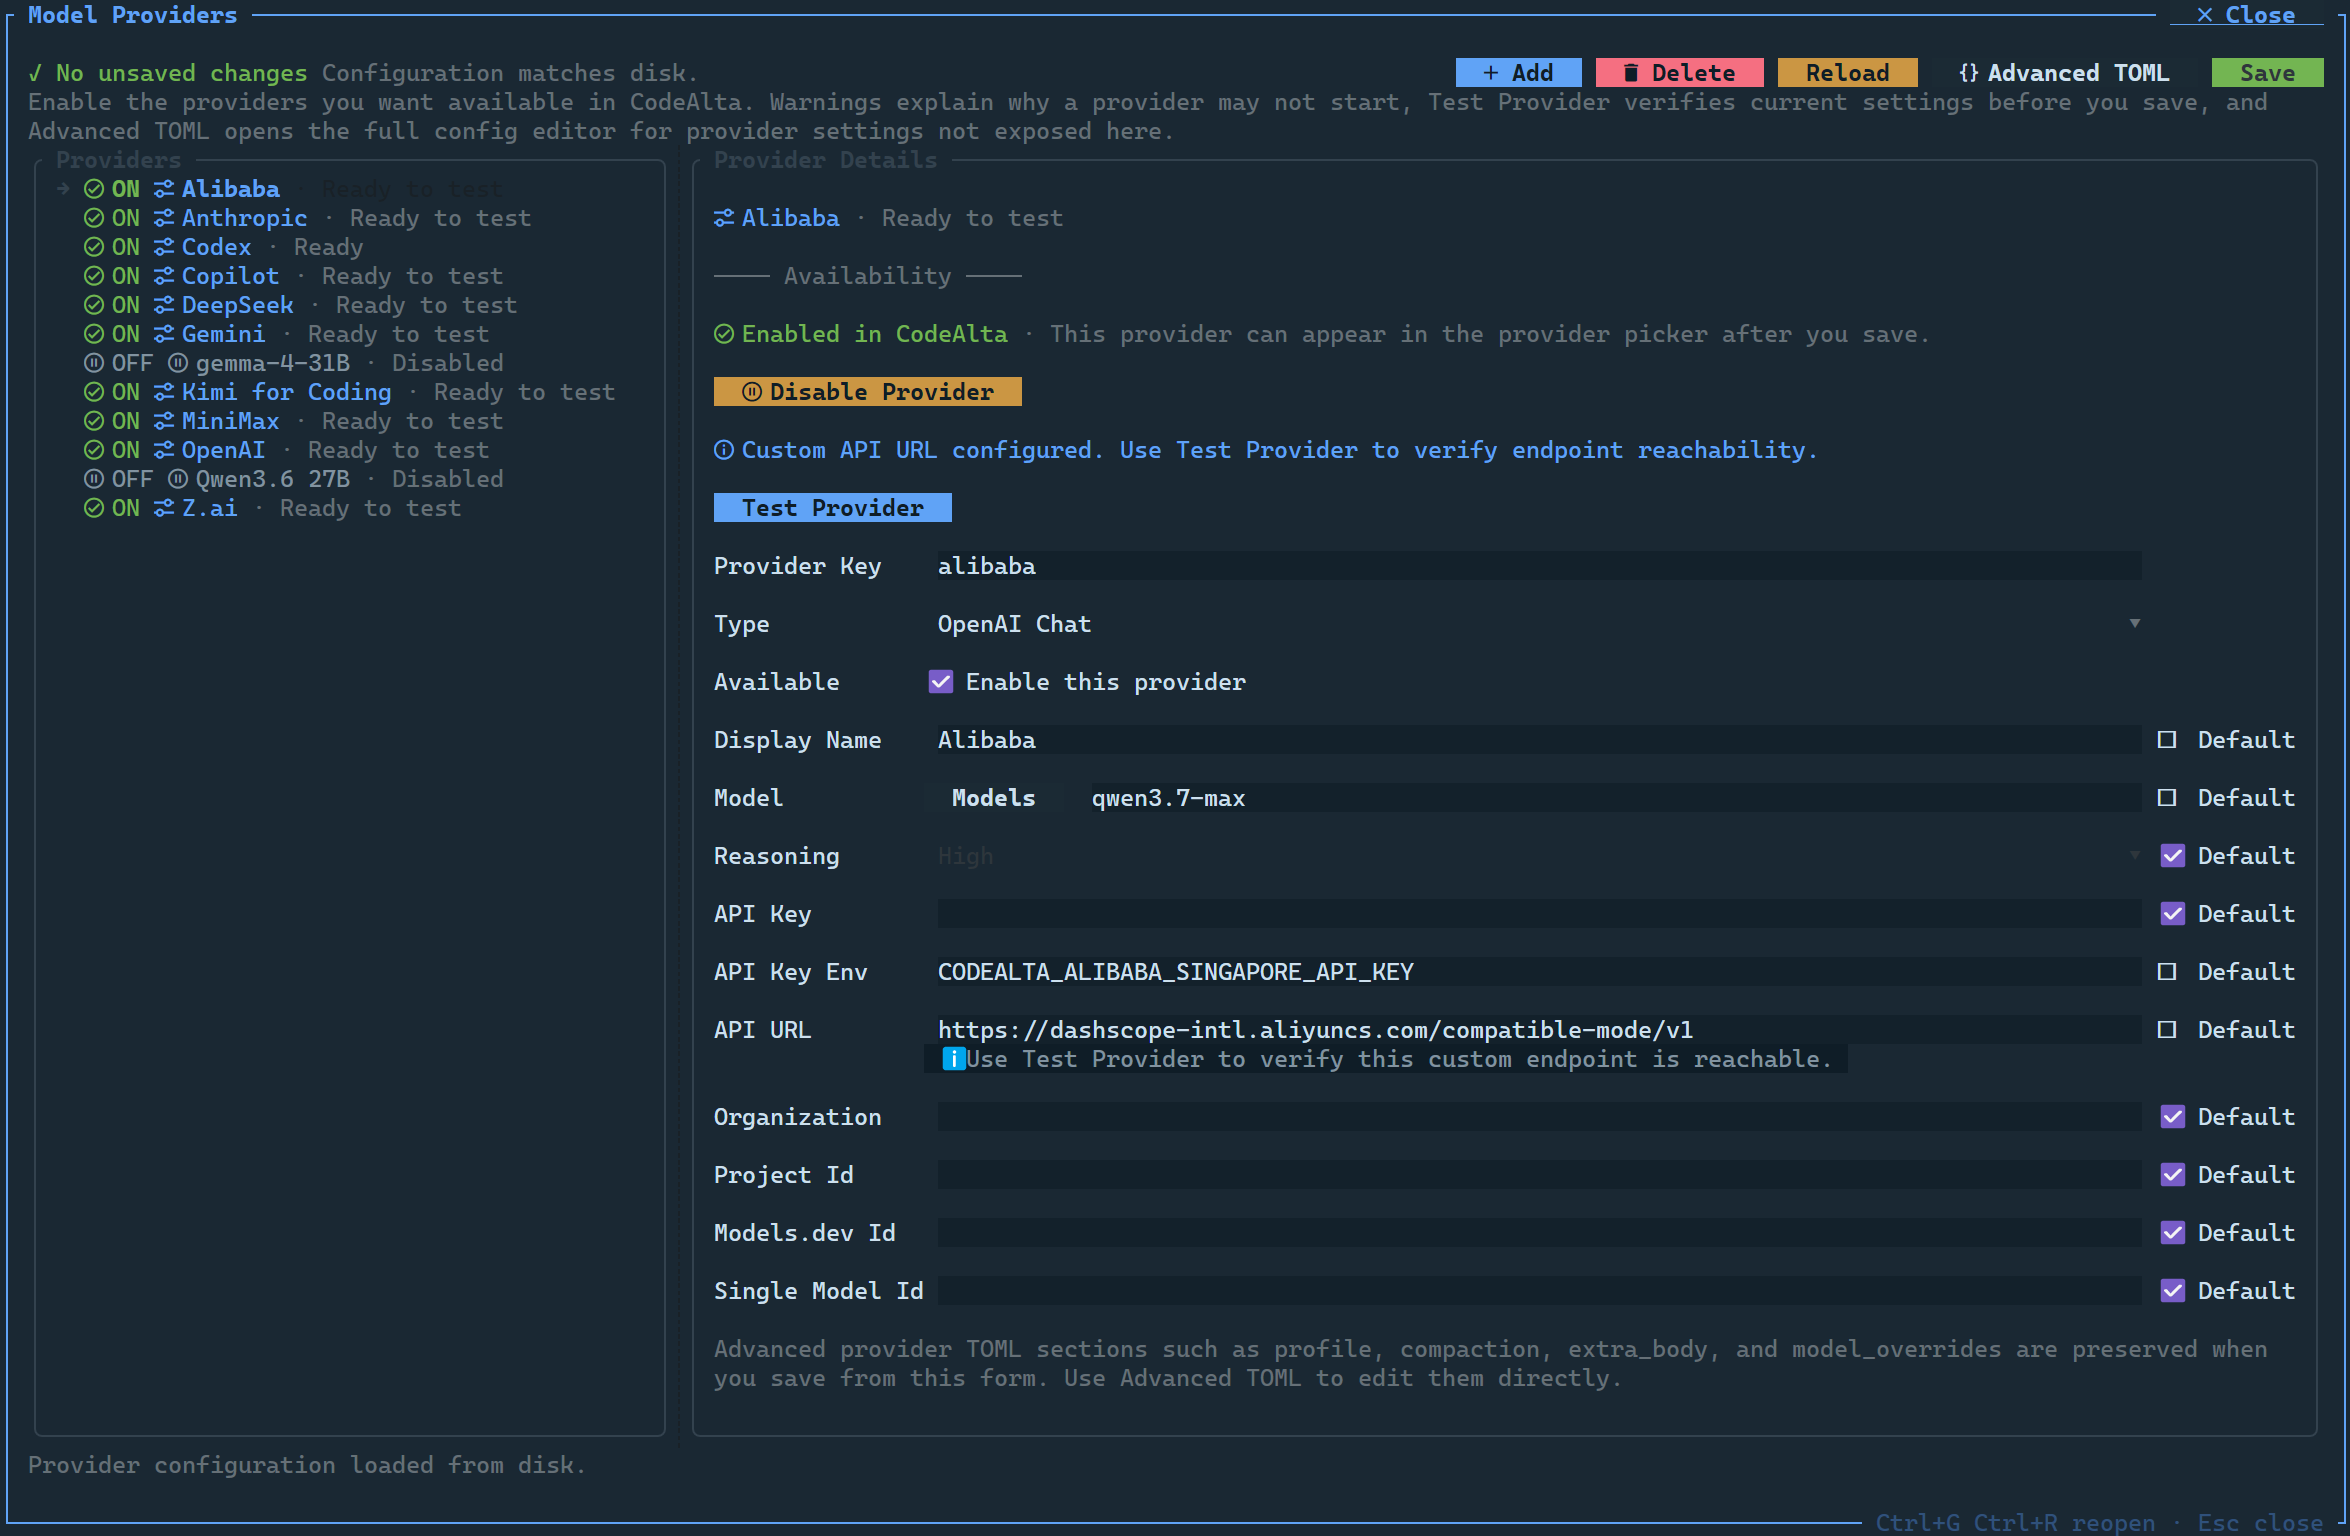
- Select a provider on the left.
- Choose or confirm the model and reasoning effort.
- Give its credentials: an API-key environment variable, an API key, or a sign-in.
- Test the provider. A successful test or sign-in enables it.
- Save: CodeAlta writes
~/.alta/config.tomland applies it.
Reopen it any time with Ctrl+G Ctrl+R or, in CodeAlta Desktop, N active providers in the ⋯ menu of the prompt.
Set up a provider
The quickest start is a subscription you already have:
- Claude Code for a Claude plan: choose Download in its Claude Code CLI box, run the command the box gives in a terminal and type
/login, then enable and Test the provider. See Claude Code. - Codex for a ChatGPT plan, Copilot for GitHub Copilot: start the browser or device sign-in, then save. See Codex and Copilot.
- A coding agent such as GitHub Copilot or Gemini CLI: Add provider, then ACP registry…, and Add the agent. See Agents of the ACP registry.
For an API-key provider, set its environment variable where CodeAlta starts, restart CodeAlta, and enable the provider. For OpenAI:
# macOS/Linux
export CODEALTA_OPENAI_API_KEY="..."

# PowerShell
$env:CODEALTA_OPENAI_API_KEY = "..."
[chat]
default_provider = "openai"

[providers.openai]
enabled = true
display_name = "OpenAI"
type = "openai-responses"
model = "gpt-5.5"
reasoning_effort = "high"
api_key_env = "CODEALTA_OPENAI_API_KEY"
api_url = "https://api.openai.com/v1"
Other providers follow the same pattern with their own variables, such as CODEALTA_ANTHROPIC_API_KEY or CODEALTA_DEEPSEEK_API_KEY. See Set up a provider for each one.
Send a first prompt
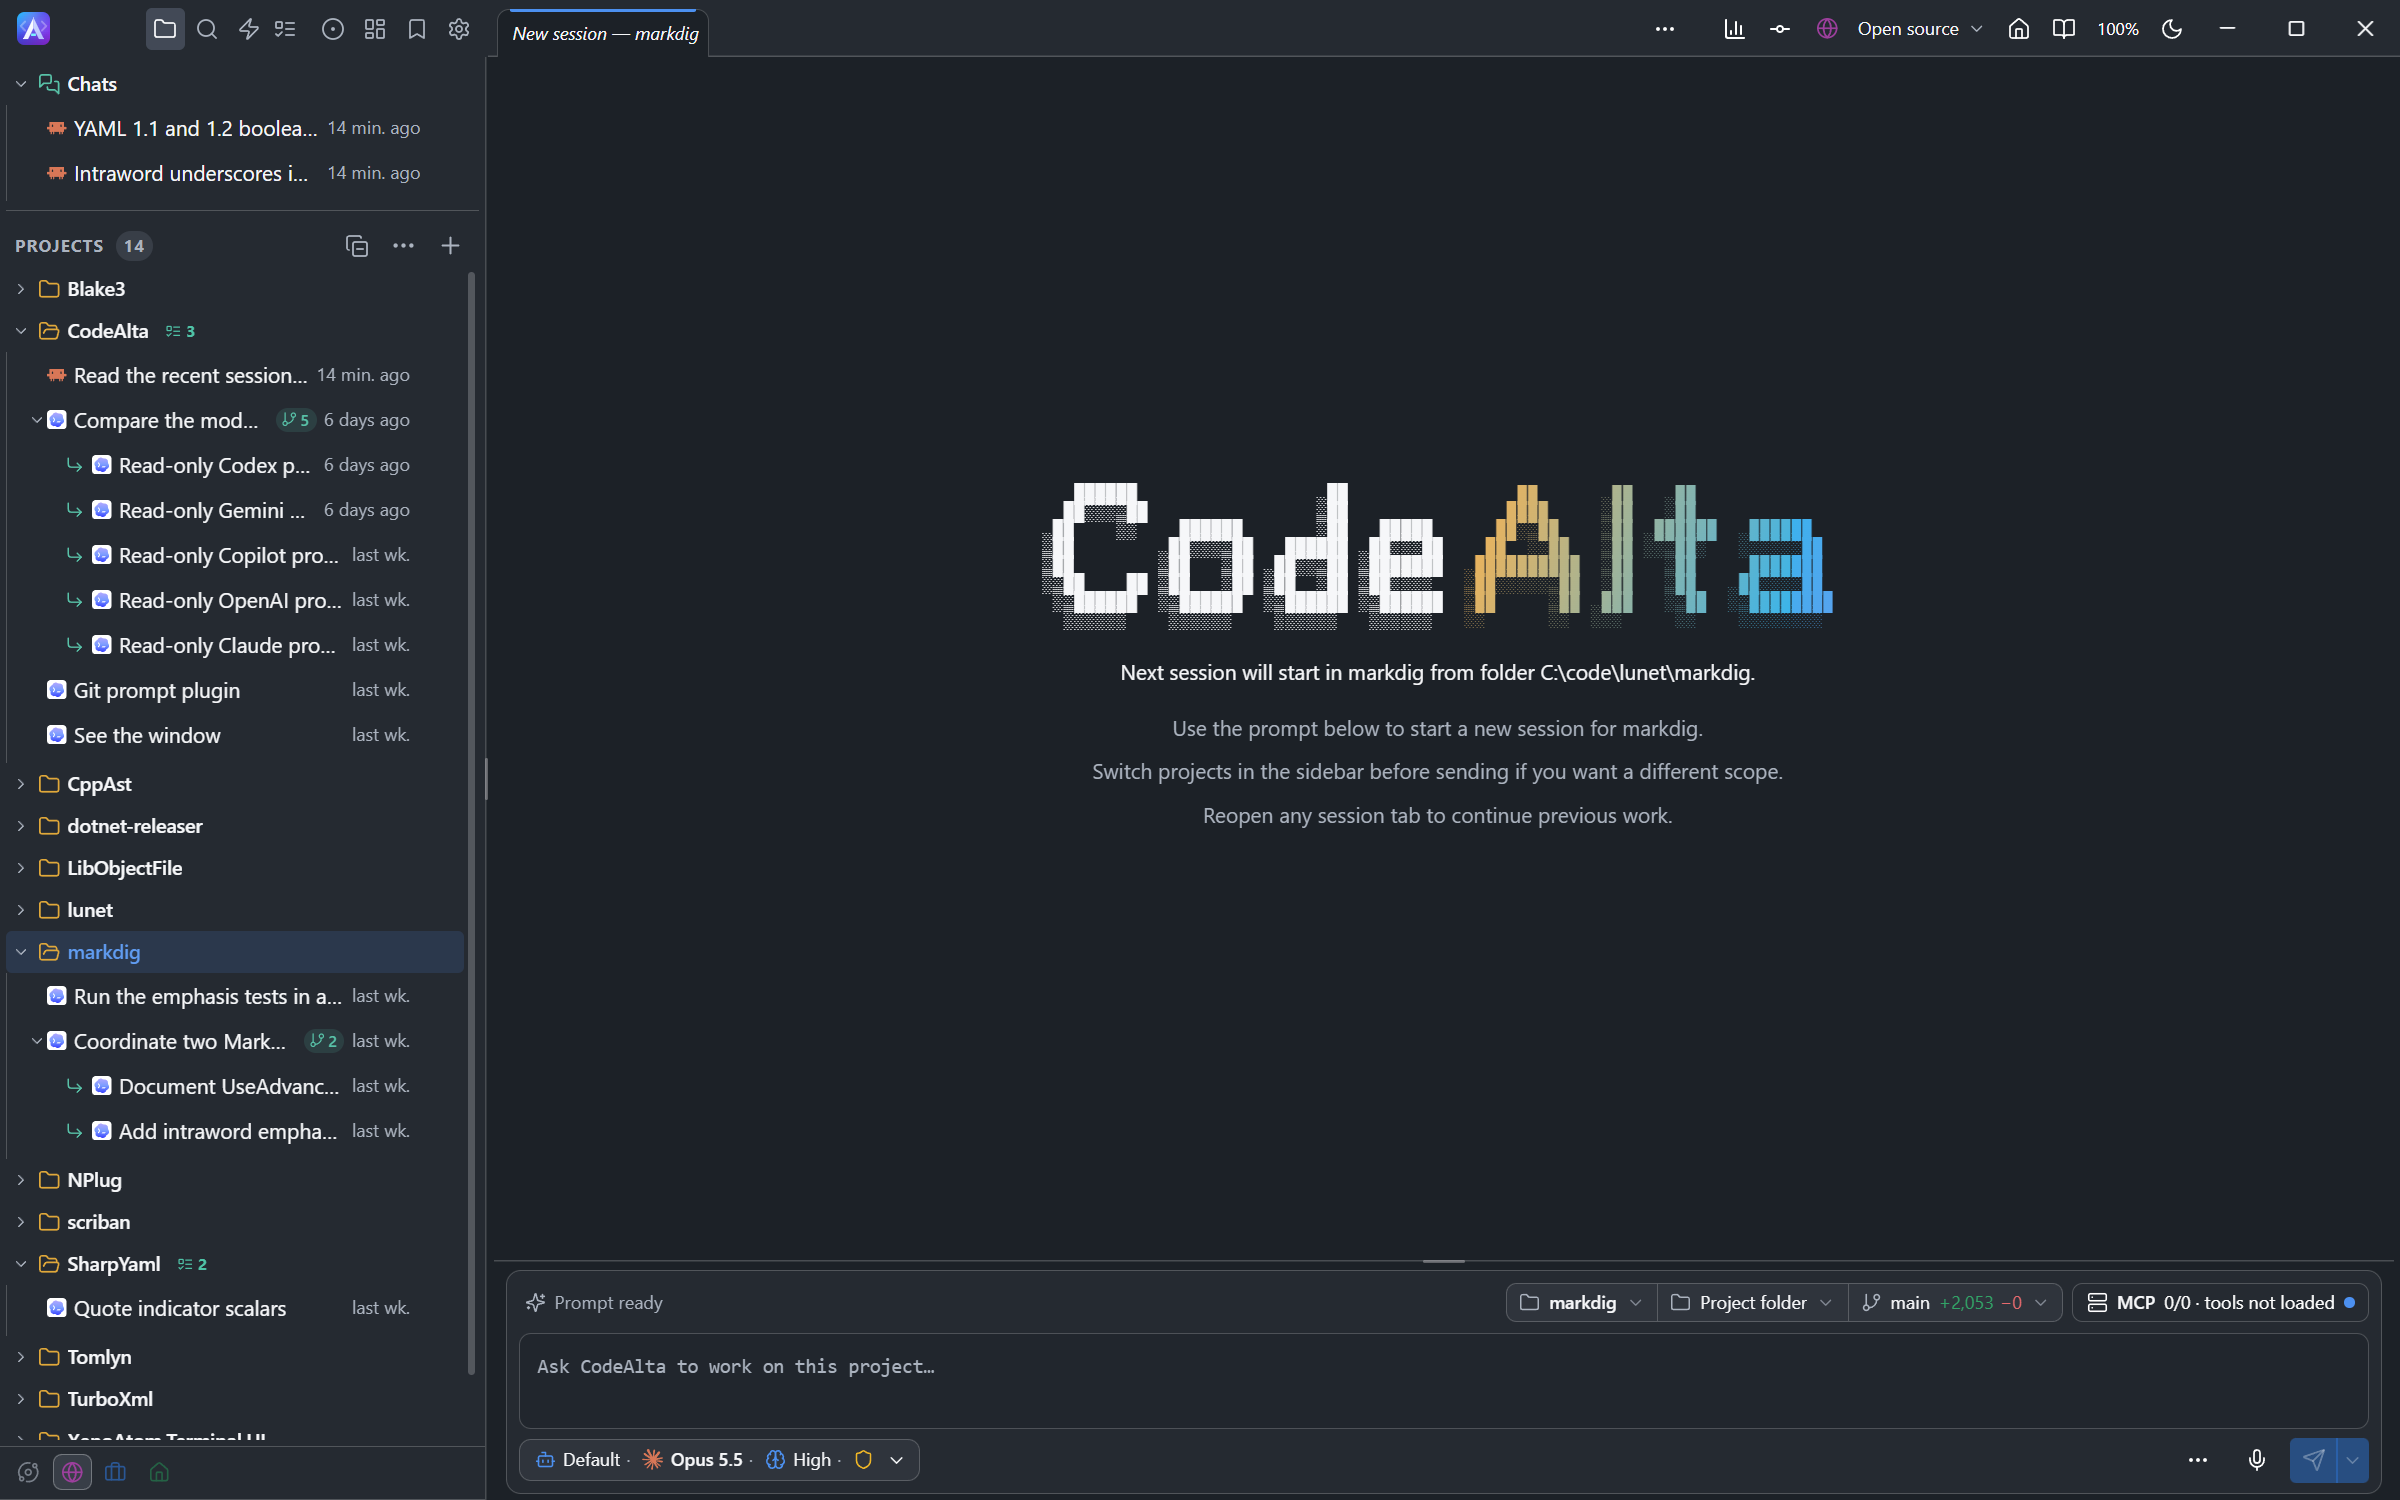
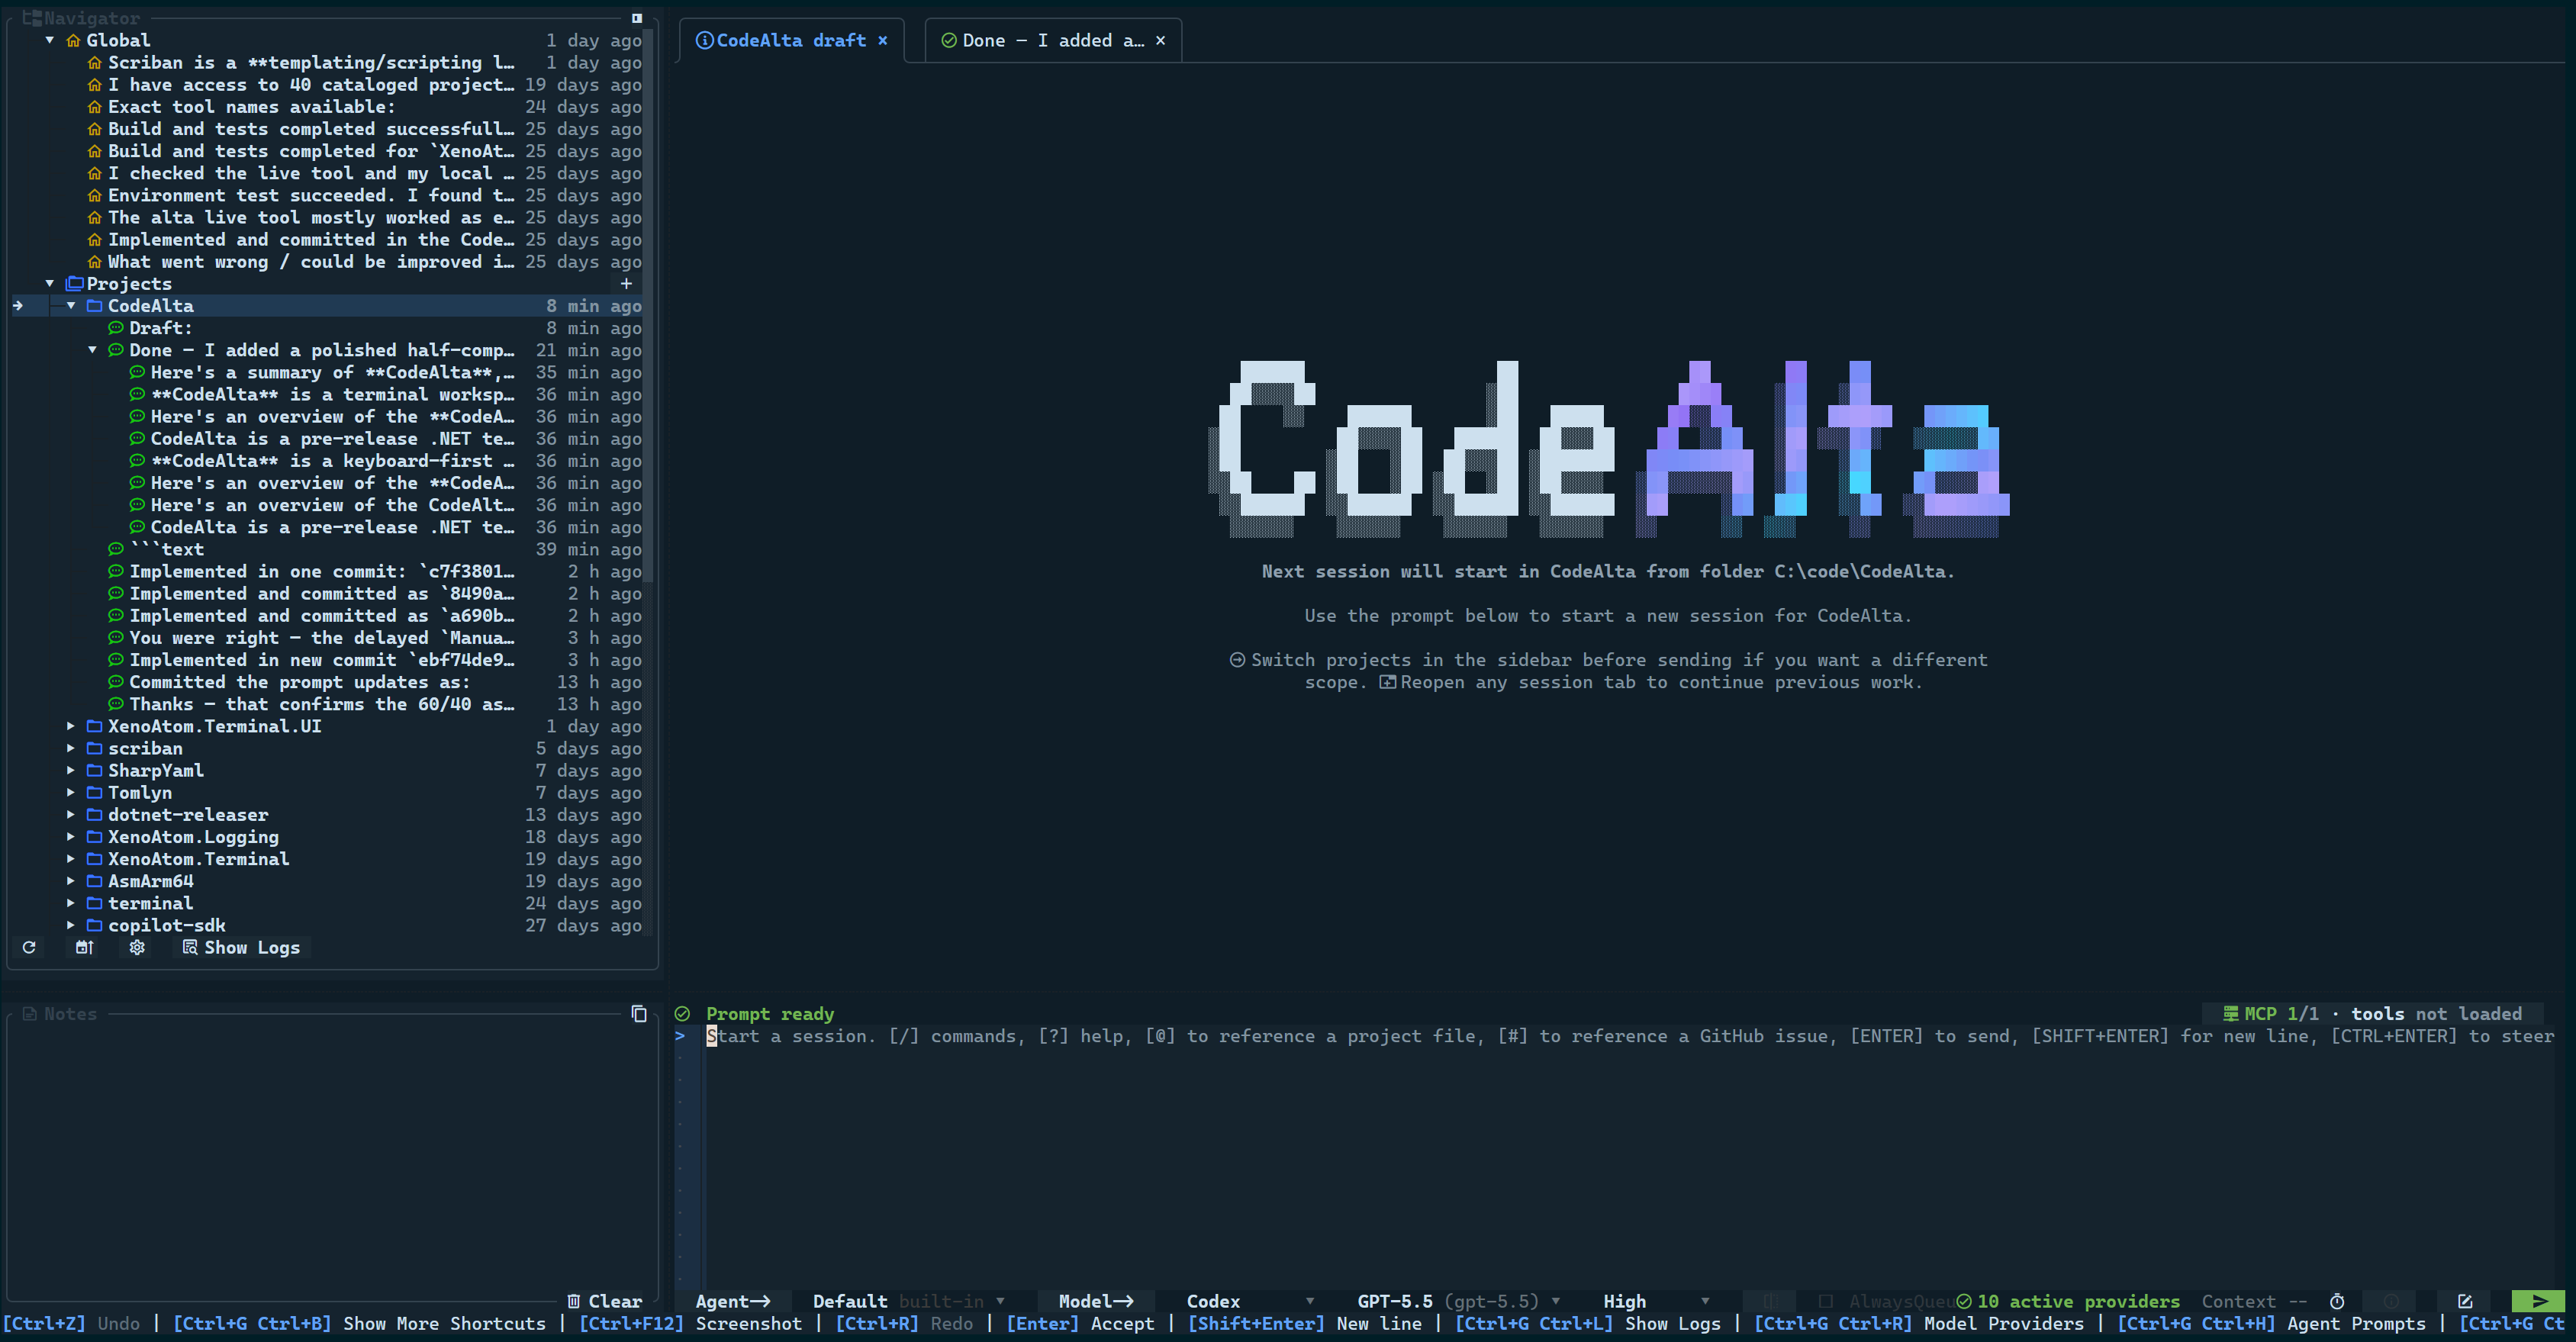
- Open a project with
Ctrl+Oor/open, or add a folder with the+button of the Projects sidebar. - If needed, choose the agent prompt, the model and the reasoning below the prompt: the Agent chip in CodeAlta Desktop, the selectors in CodeAlta TUI.
- Type a prompt, and press
Enterto send it.Shift+Enteradds a new line. - Watch the timeline: reasoning, messages, tool calls and their results, statistics and changed files.
The built-in Default agent prompt inspects, edits, verifies and reports. Plan researches and writes a plan under .alta/plans/ for your review before any change. See Agent Prompts for these modes and your own.
Useful first prompts:
Summarize this repository and identify the main build/test commands.
Inspect the failing test output below and propose the smallest safe fix.
Mention files and issues
Type @ in the prompt to search the files and folders of the project. An accepted entry is inserted as a Markdown link, such as [Program.cs](src/CodeAlta.Tui/Program.cs), and sent as an attachment. A raw @path, a quoted path and a :line or :start-end suffix are recognized too.
In GitHub, GitLab and Azure DevOps repositories, type # to search recent issues (work items on Azure DevOps) by number or words. The picker inserts links such as [#18](https://github.com/org/repo/issues/18). See the Git plugin.
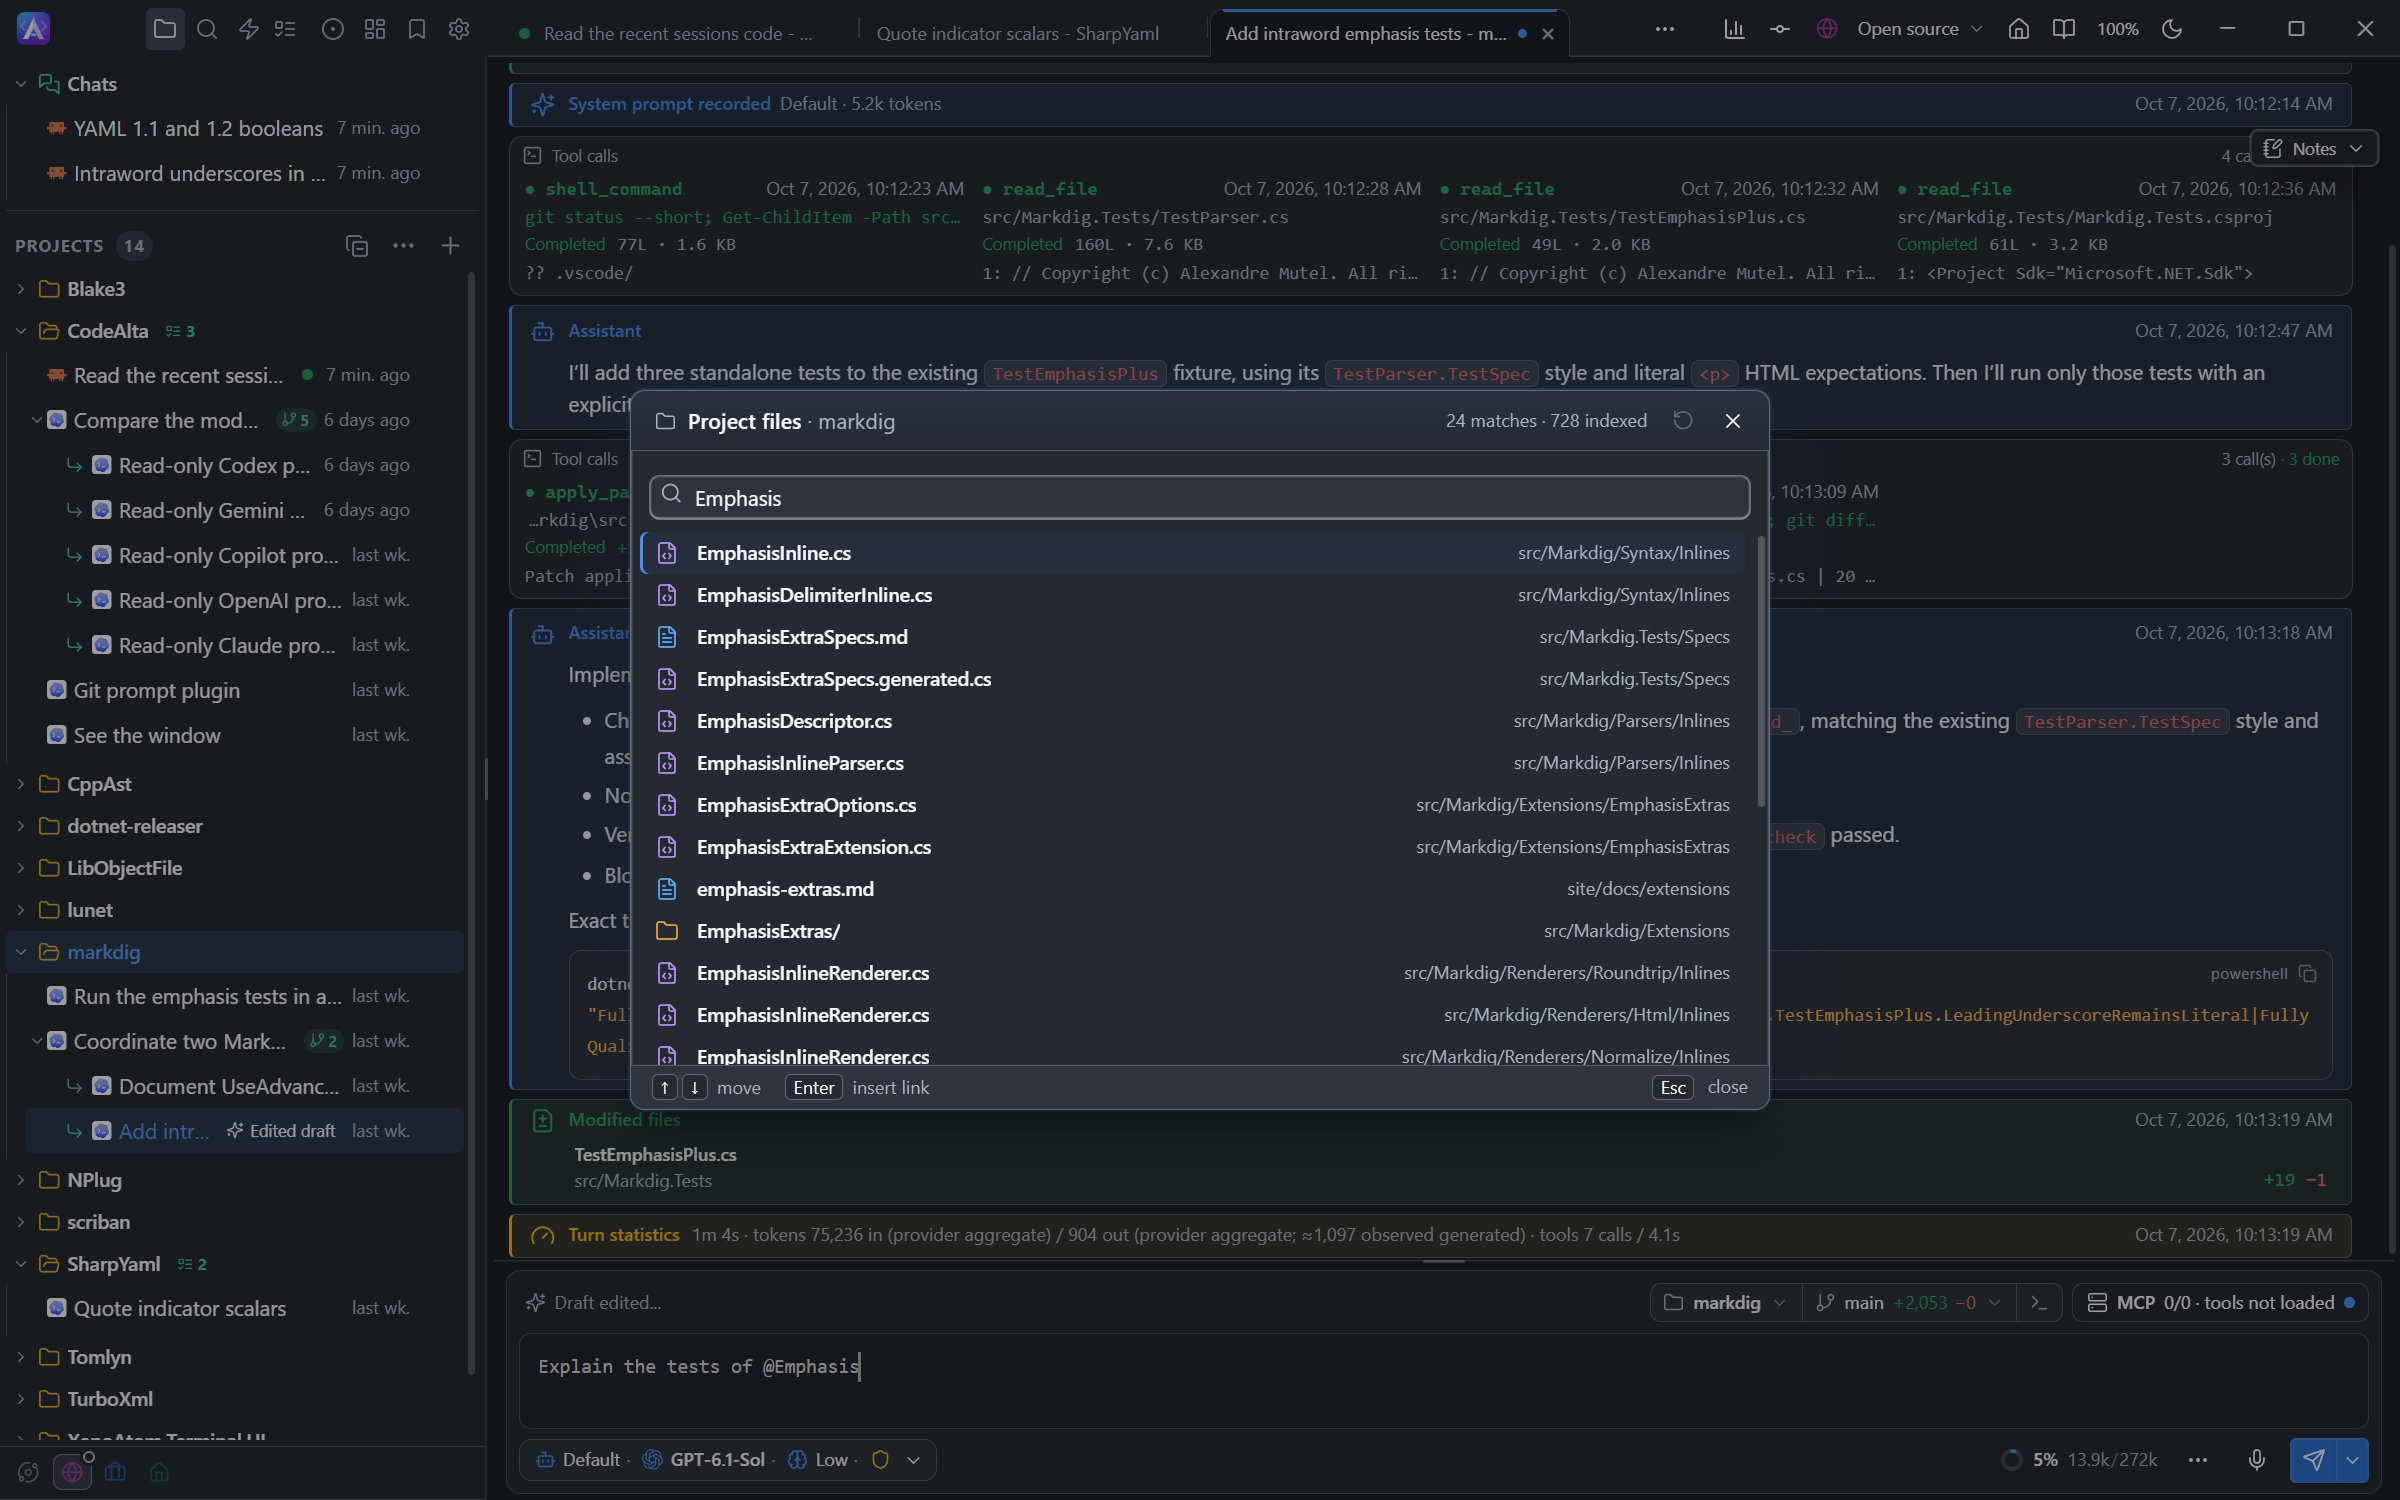
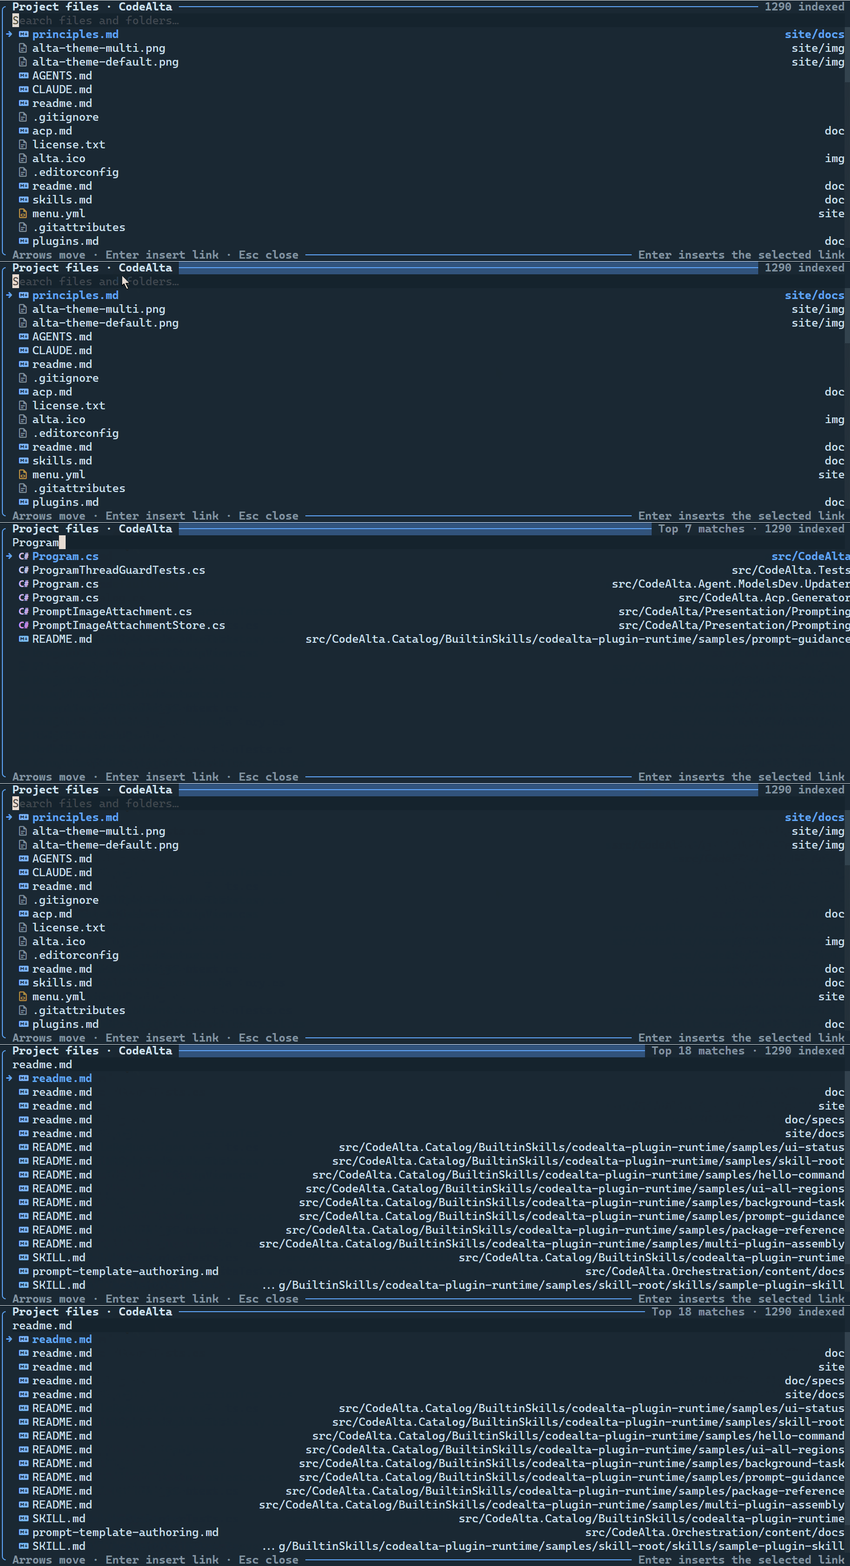
@, search for files or folders, and accept entries to add them to the prompt as structured attachments.Attach files
In the desktop app, the paperclip button of the prompt bar opens a menu (in the ⋯ menu in a narrow window):
- Add files or photos (
Ctrl+U,Cmd+Uon macOS, or/attach_files) opens the file dialog of the system. You can also drop files onto the prompt, or copy them and pressCtrl+Vin it. - Add folder… (
Ctrl+Alt+For/attach_folder) opens the folder dialog in the session's folder. A folder of the project reaches the agent as with@; any other folder, by its full path. - Add issues… (
Ctrl+Alt+Ior/attach_issues) opens the issue picker: check issues with a click, their box orShift+Enter, then Attach (orEnter). Cancel (orEsc) drops them.
Each attachment appears above the prompt; click a file or an image to preview, rename or remove it. When the prompt is sent, the links of folders and issues are added at the end of its text, and CodeAlta keeps a copy of each file with the session, so editing or deleting the original later changes nothing. The model gets each file in a form it reads:
| File | What the model gets |
|---|---|
| Image (PNG, JPEG, WebP, GIF, BMP) | The image, scaled down to 2000 pixels on its longest side and 3.75 MB at most. The model must read images. |
| The document itself for a model that reads PDFs (the Claude models of Anthropic and of Claude Code); its text, in Markdown, for the others. | |
| Word, Excel, PowerPoint, EPUB, RTF | Its text, converted to Markdown. |
| Text: code, Markdown, CSV, JSON, logs… | Its content, up to 100,000 characters; the agent reads the rest from the stored copy. |
| Any other file | Its path: the agent opens it with its tools. |
A file is attached up to 20 MB, and a prompt takes at most 64 attachments and 64 MB. Only images need a model that reads images.
The conversion to Markdown uses MarkItDotNet, run with dotnet dnx of the .NET SDK 10 or later; the first conversion downloads it from nuget.org. A document that cannot be converted reaches the model by its path, and the agent can try again with the built-in document-conversion skill.
- Desktop: the prompt in the timeline lists the files it was sent with.
- TUI: pasting an image opens a preview where you give it a title before it is attached. Other files are named with
@.
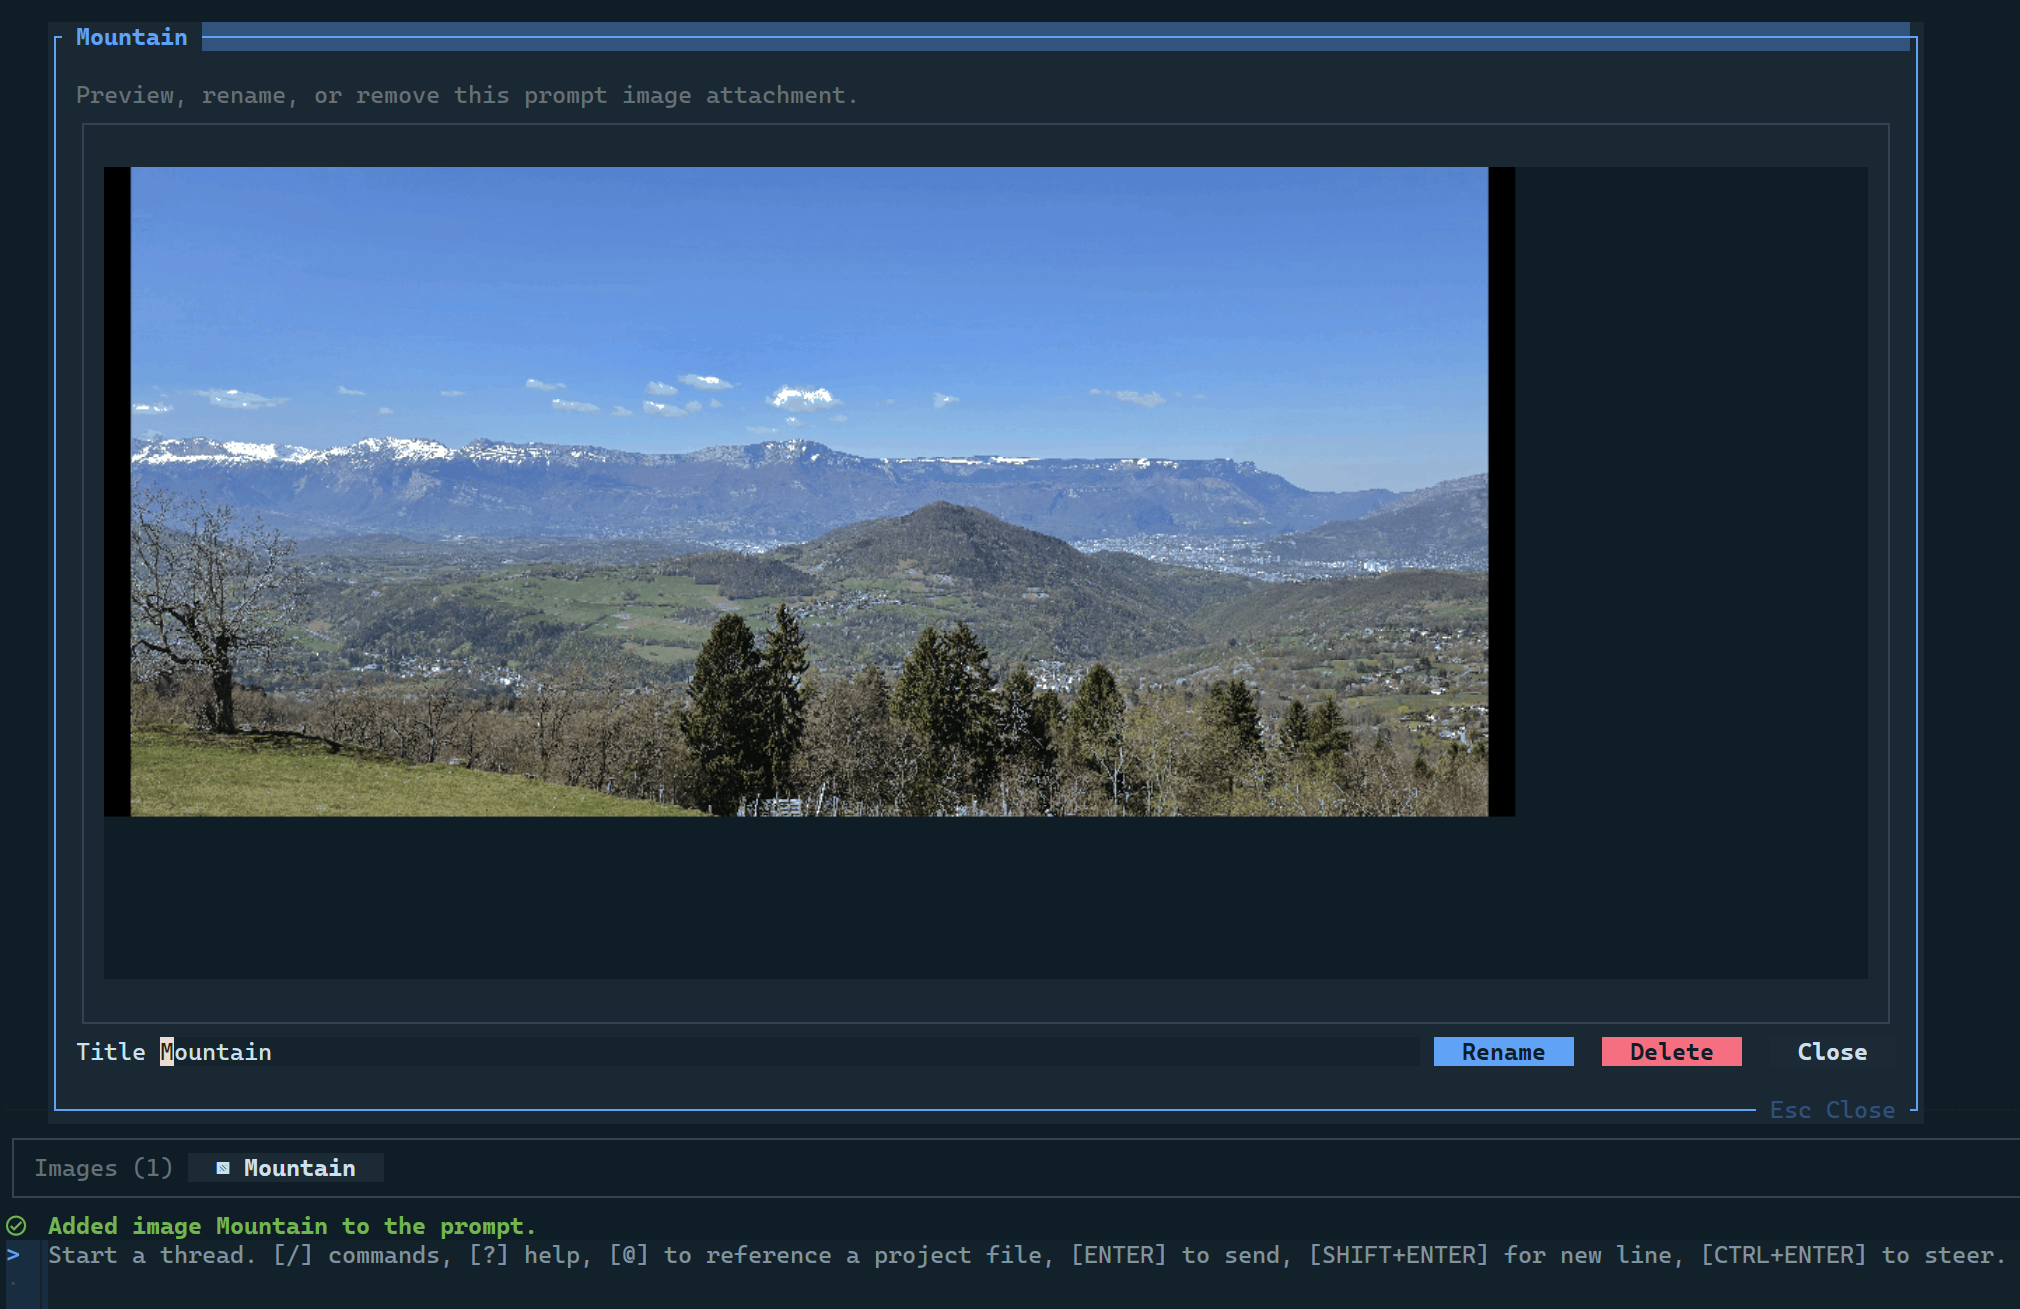
In the TUI, the image preview needs a terminal that shows images: Sixel, such as Windows Terminal, or the Kitty and iTerm2 protocols.
Images the agent reads
The agent can open an image on its own with its view_image tool. Give it a path, or let it find the file:
Look at docs/img/login-page.png and tell me why the button is misaligned.

Take a screenshot of the app with the test script, then check that the dialog is centered.
PNG, JPEG, GIF, WebP and BMP files are read, scaled down to 2000 pixels on their longest side. Images returned by MCP tools, such as a browser screenshot, reach the model the same way. The model must read images.
- Desktop: the timeline shows an Image read card with a preview; click it to open the image. Right-click a thumbnail and choose Copy image, or use Copy image or
Ctrl+Cin its window, to copy it as PNG. - TUI: the tool call shows the name, type and size of the image.
Ask about CodeAlta
This guide ships with CodeAlta, and every agent can read it. Ask a session how to do something:
How do I make the conversation narrower?
Where do I see the pull requests of my project?
The agent answers from the guide and can walk you through the interface step by step.
Essential shortcuts
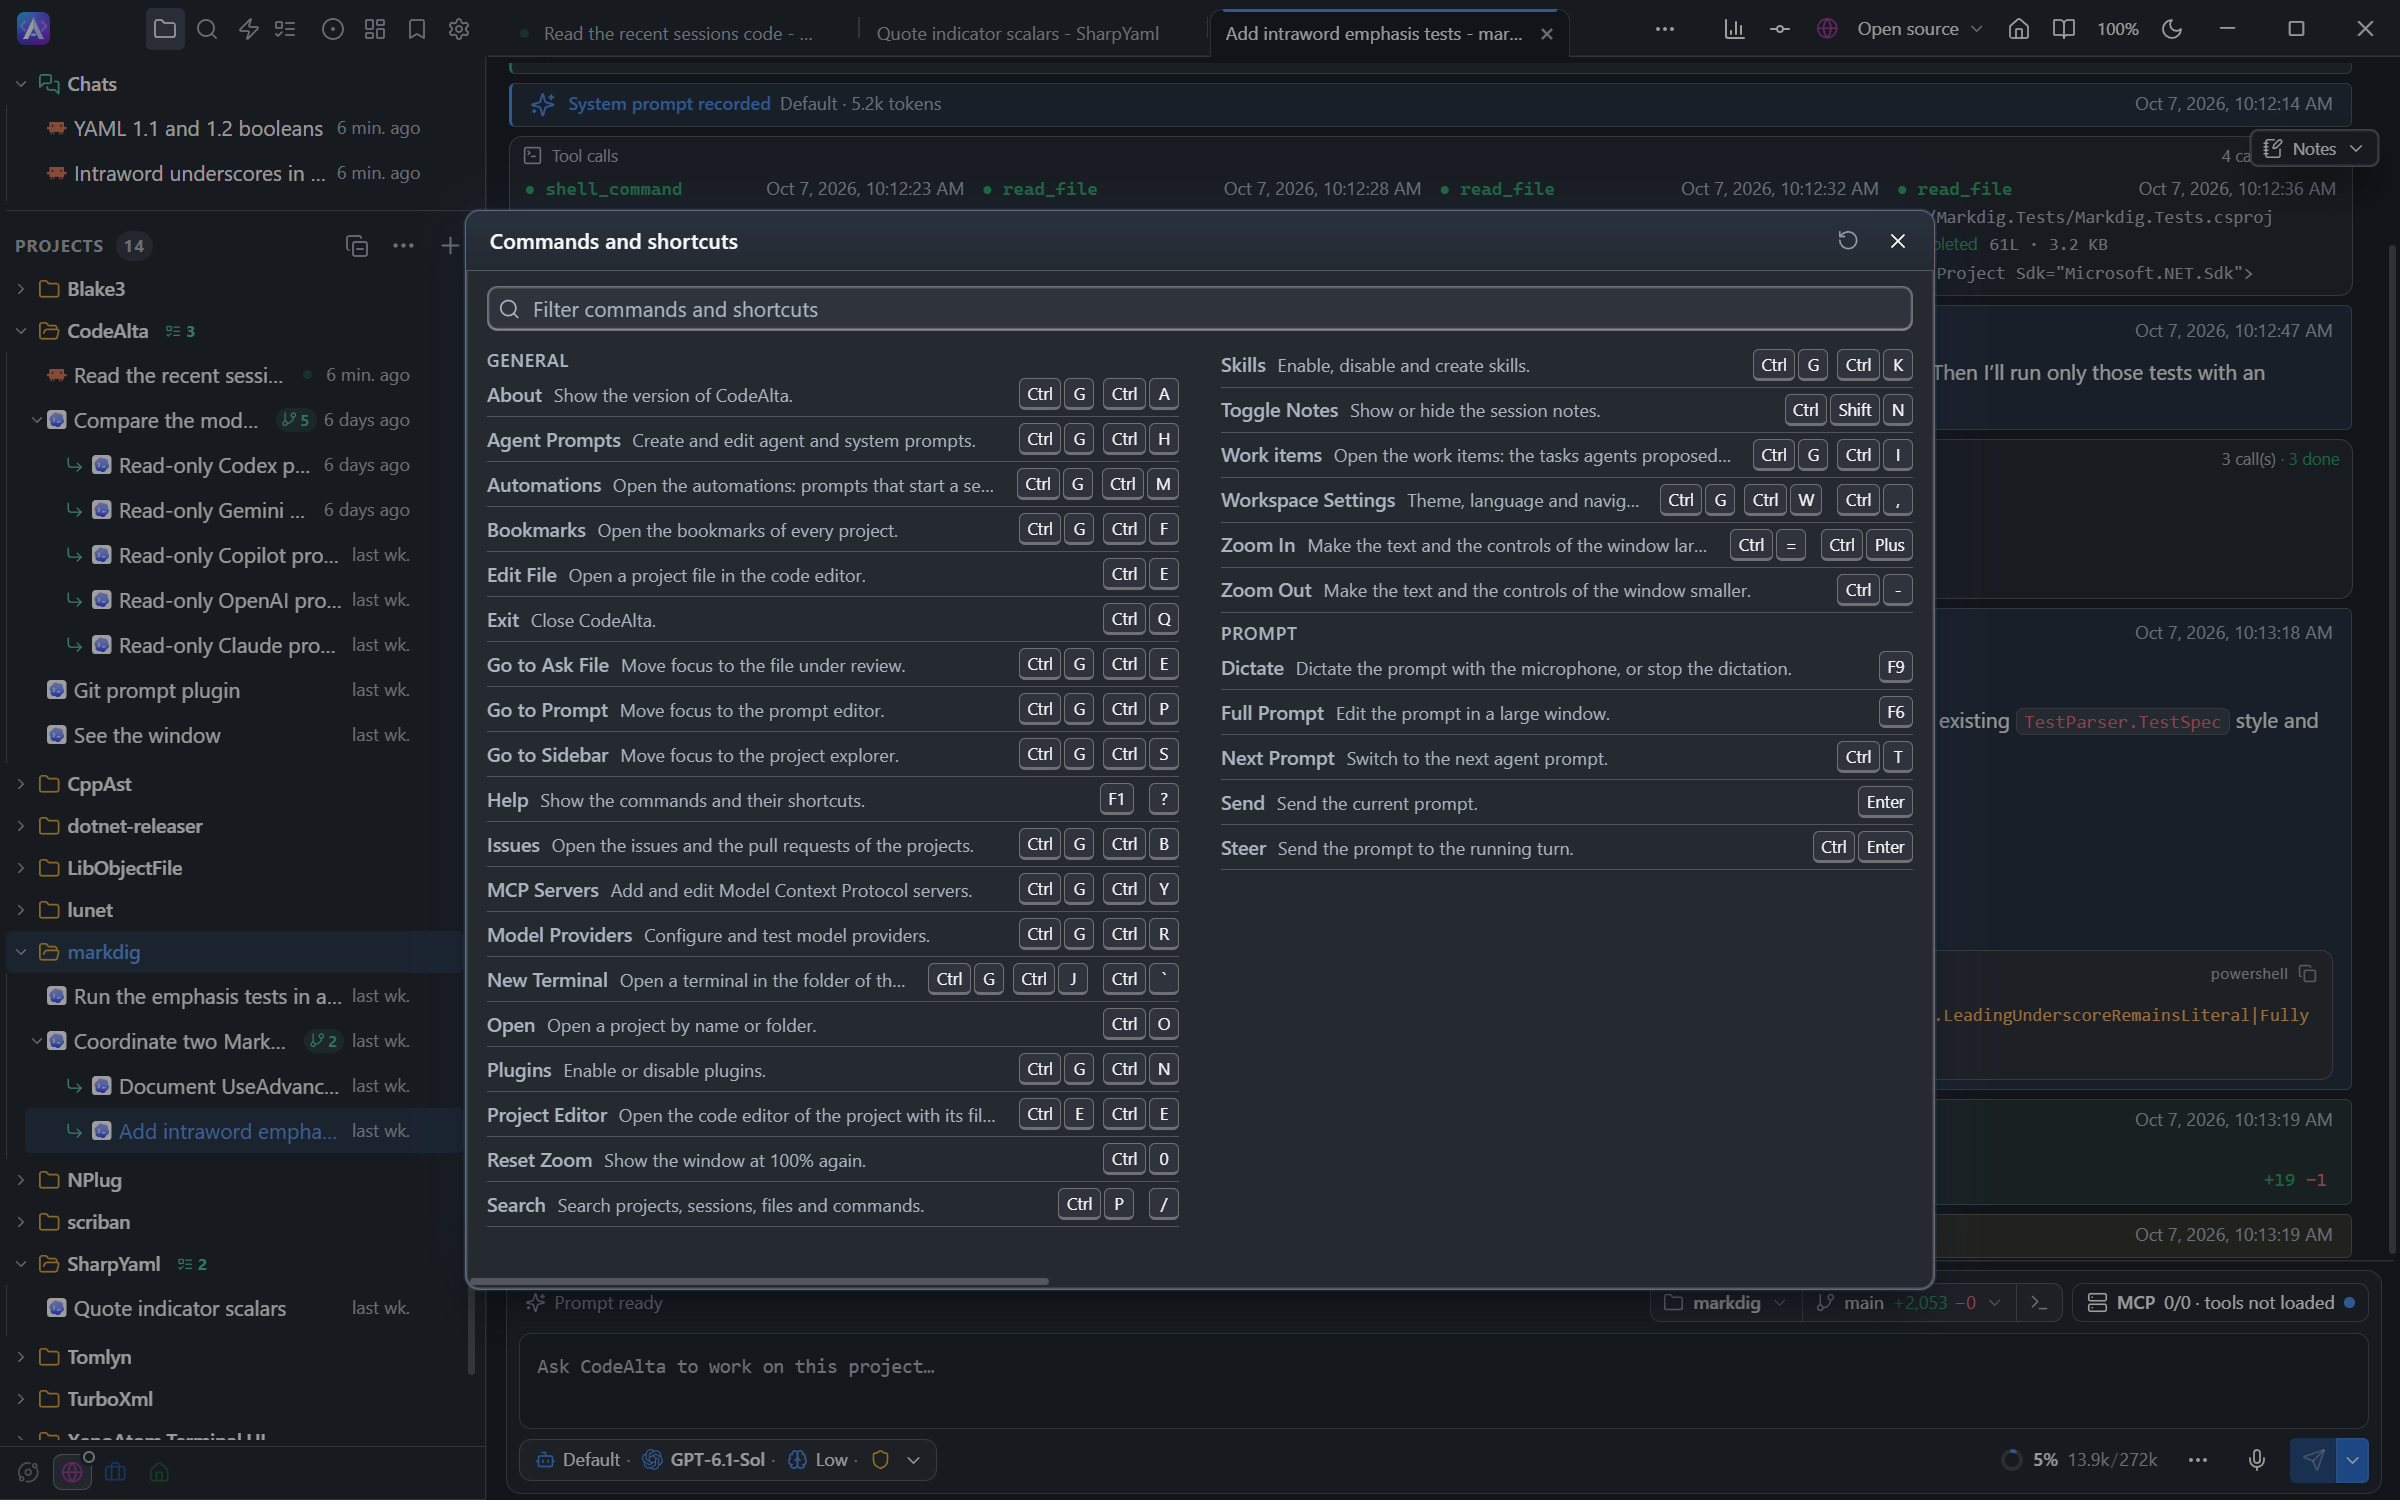
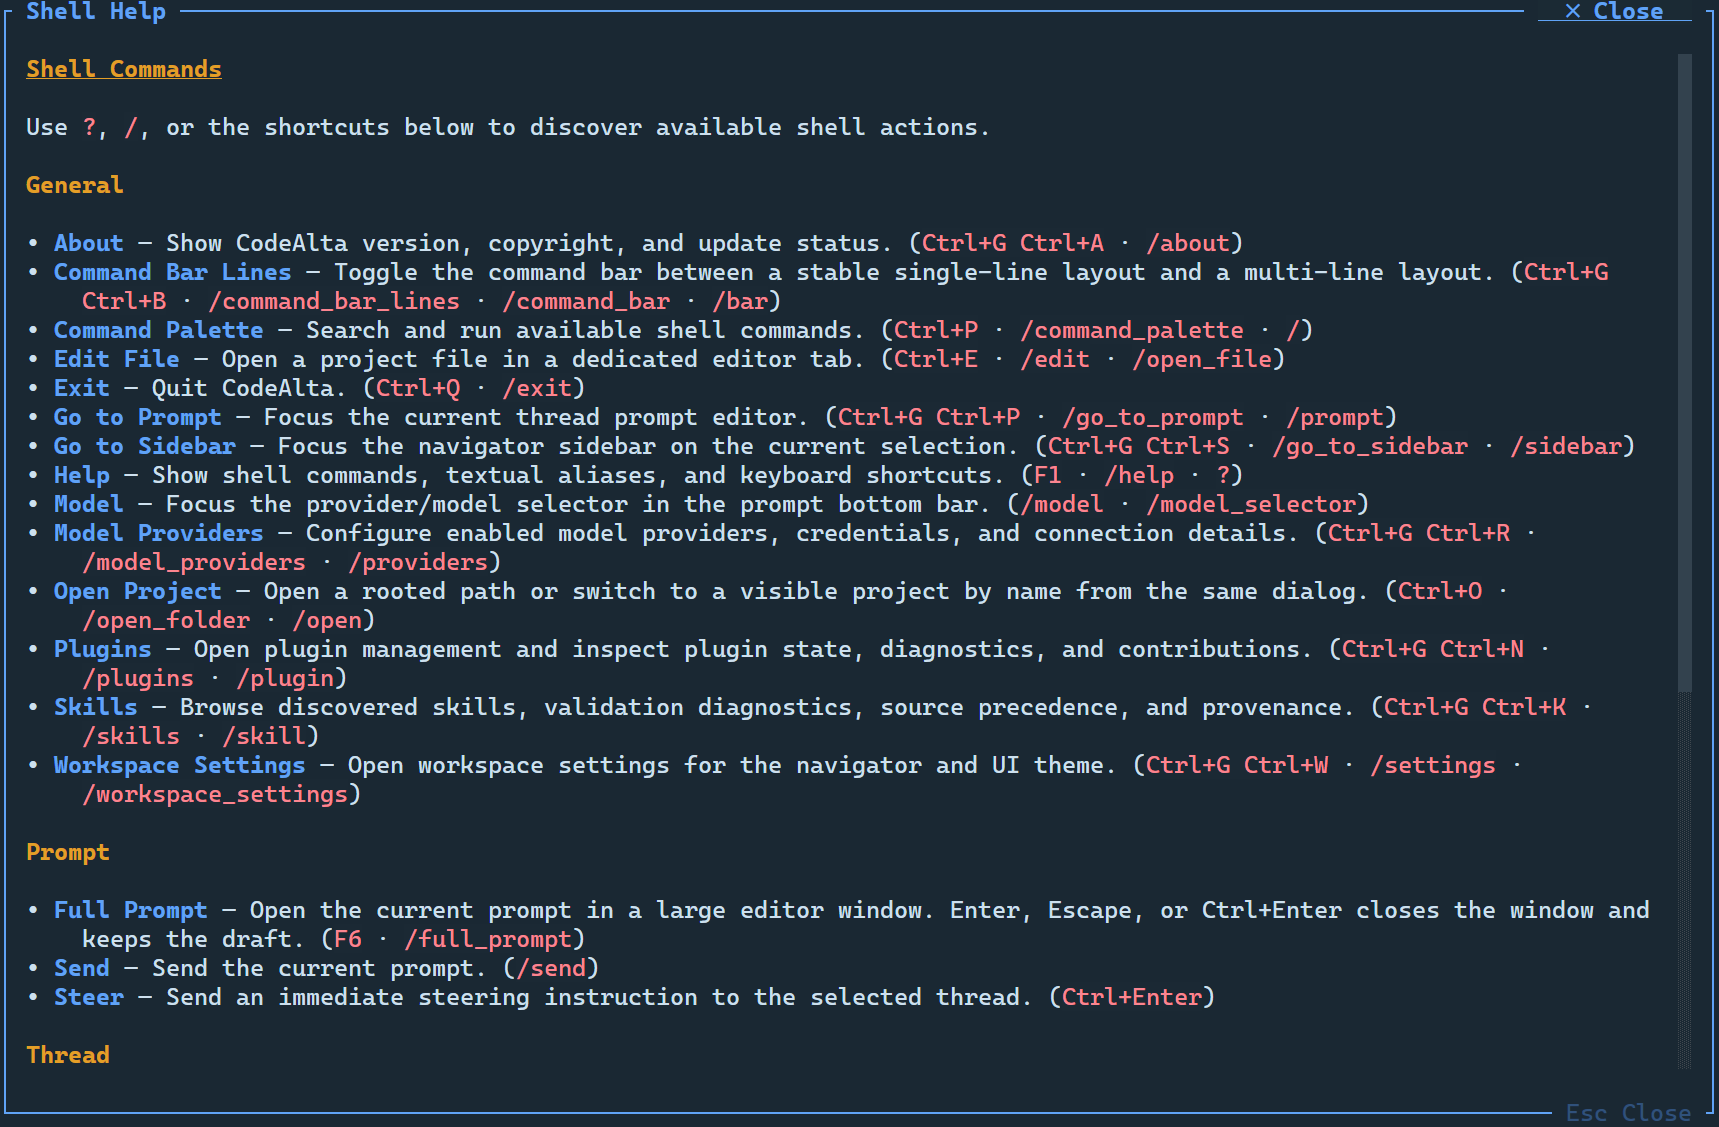
F1, /help, or ? in an empty prompt whenever you need a reminder of the commands and their shortcuts.Both apps use the same shortcuts and slash commands unless noted.
| Action | Shortcut or command |
|---|---|
| Help / command discovery | F1, /help, or ? |
| Search (desktop) or command palette (TUI) | Ctrl+P; / for commands, and for skills in the desktop app |
| Open project | Ctrl+O or /open |
| Open a file in the editor | Ctrl+E or /edit |
| Open the code editor of the project (desktop) | Ctrl+E Ctrl+E or /editor |
| Open full prompt editor | F6 |
| Attach files, a folder, issues (desktop) | Ctrl+U (Cmd+U on macOS), Ctrl+Alt+F, Ctrl+Alt+I or /attach_files, /attach_folder, /attach_issues |
| Choose agent, model and reasoning | /model |
| Open model providers | Ctrl+G Ctrl+R or /model_providers |
| Manage prompts | Ctrl+G Ctrl+H or /prompt |
| Switch to next agent prompt | Ctrl+T or /next_prompt |
| Browse models | Ctrl+G Ctrl+O or /models |
| About / update status | Ctrl+G Ctrl+A or /about |
| Open settings | Ctrl+G Ctrl+W or /settings (also Ctrl+, in the desktop app) |
| Open skills | Ctrl+G Ctrl+K or /skills |
| Open plugins | Ctrl+G Ctrl+N or /plugins |
| Open MCP servers | /mcp (also Ctrl+G Ctrl+Y in the desktop app) |
| Open logs | Ctrl+G Ctrl+L or /logs |
| Toggle navigator | Ctrl+G Ctrl+G |
| Context usage | Ctrl+G Ctrl+U |
| Session info | Ctrl+G Ctrl+T |
| Reminders | Ctrl+G Ctrl+D or /reminder |
| Open the bookmarks (desktop) | Ctrl+G Ctrl+F or /bookmarks |
| Previous / next bookmarked message (desktop) | Shift+F3 / Shift+F4 |
| Send when idle / enqueue while busy | Enter |
| Send now (steer while busy) | Cmd+Enter on macOS (Desktop); Ctrl+Enter on Windows/Linux (Desktop) or in TUI |
| Abort the running turn | F8 or /abort |
| Dictate a prompt (desktop) | F9 |
| Compact idle session | Ctrl+F11 or /compact |
| Fork a session, or rewind it to an earlier turn (desktop) | /fork, /rewind |
| Clear prompt queue | F10 |
| Previous/next user or assistant message | F3 / F4 |
| Switch tabs | Ctrl+Alt+Left / Ctrl+Alt+Right (also Ctrl+Shift+Tab / Ctrl+Tab and Ctrl+PageUp / Ctrl+PageDown in the desktop app) |
| Go to a space (desktop) | Ctrl+G Ctrl+V or /space |
| Show the space at a place of the list (desktop) | Ctrl+G 1 to Ctrl+G 9 |
| Previous / next space (desktop) | Ctrl+Alt+PageUp / Ctrl+Alt+PageDown |
| Close tab / reopen closed tab (desktop) | Ctrl+W / Ctrl+Shift+T |
| Browse saved sessions (desktop) | Ctrl+Alt+B or /sessions |
| Show or hide session notes (desktop) | Ctrl+Shift+N or /notes |
| Open the statistics page (desktop) | Ctrl+G C or /statistics |
| Zoom in / out / reset (desktop) | Ctrl+= or Ctrl+Plus / Ctrl+- / Ctrl+0, or /zoom_in / /zoom_out / /reset_zoom, or the percentage in the title bar |
| Copy the UI as an image (TUI) | Ctrl+F12 |
If these shortcuts do not work in Windows Terminal, see Windows Terminal shortcuts.